We appreciate your interest in exploring Silent Data [Oracle]. To commence your journey, kindly access Silent Data [Oracle] through Silent Data [Oracle].
For the Smart contract addresses please see Smart Contracts Addresses per Network.
Signup Page
Upon accessing the platform, you may proceed with the login or, if unregistered, initiate the registration.
Home Page
Upon successful registration and email verification, you can log in to the platform and start your initial job creation.
The dashboard provides various informative sections and links.
Within the dashboard, accessible links include:
Dashboard overview:
- List of previously created jobs
- Enclaves to monitor job statuses
- Refer to the accompanying diagram for a visual representation of the operational workflow.
- On the left side of the page, you can:
- Initiate Job configuration by selecting "+ CREATE JOB"
- Access documentation via "DOCS"
- Explore Team settings through "TEAM SETTINGS"
- Generate smart contracts for Oracle interaction by selecting "GENERATE"
- Facilitate our mock tokens (mUSDC) transfers to your wallet by selecting "TRANSFER"
To initiate the creation of a new job, navigate to the "+ CREATE JOB" option and specify the title for the job. In the illustrative instance, we will use the title "StripePaymentCheck," with a specific focus on verifying payment statuses.
Job Configuration Page
TRIGGER
The designated trigger for this job is a webhook. For guidance on configuring the trigger, refer to the documentation provided: Configure the trigger.
In the event that a smart contract is required to activate your job, you may utilize the smart contract generation feature by selecting the "GENERATE" option on your job configuration. If you need more details on how to create the trigger smart contract check here.
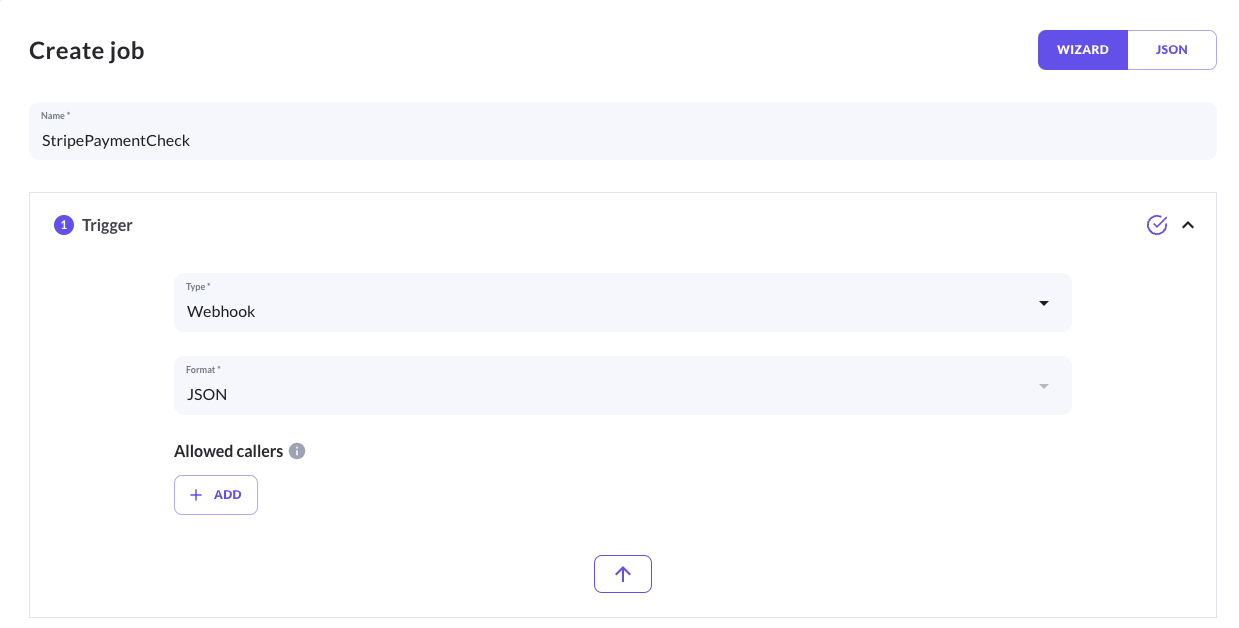
In our example, upon triggering the process, the following body will be transmitted, encapsulating the payment ID for validation.
//body of the webhook trigger
{
    "id":"ddddd"
}
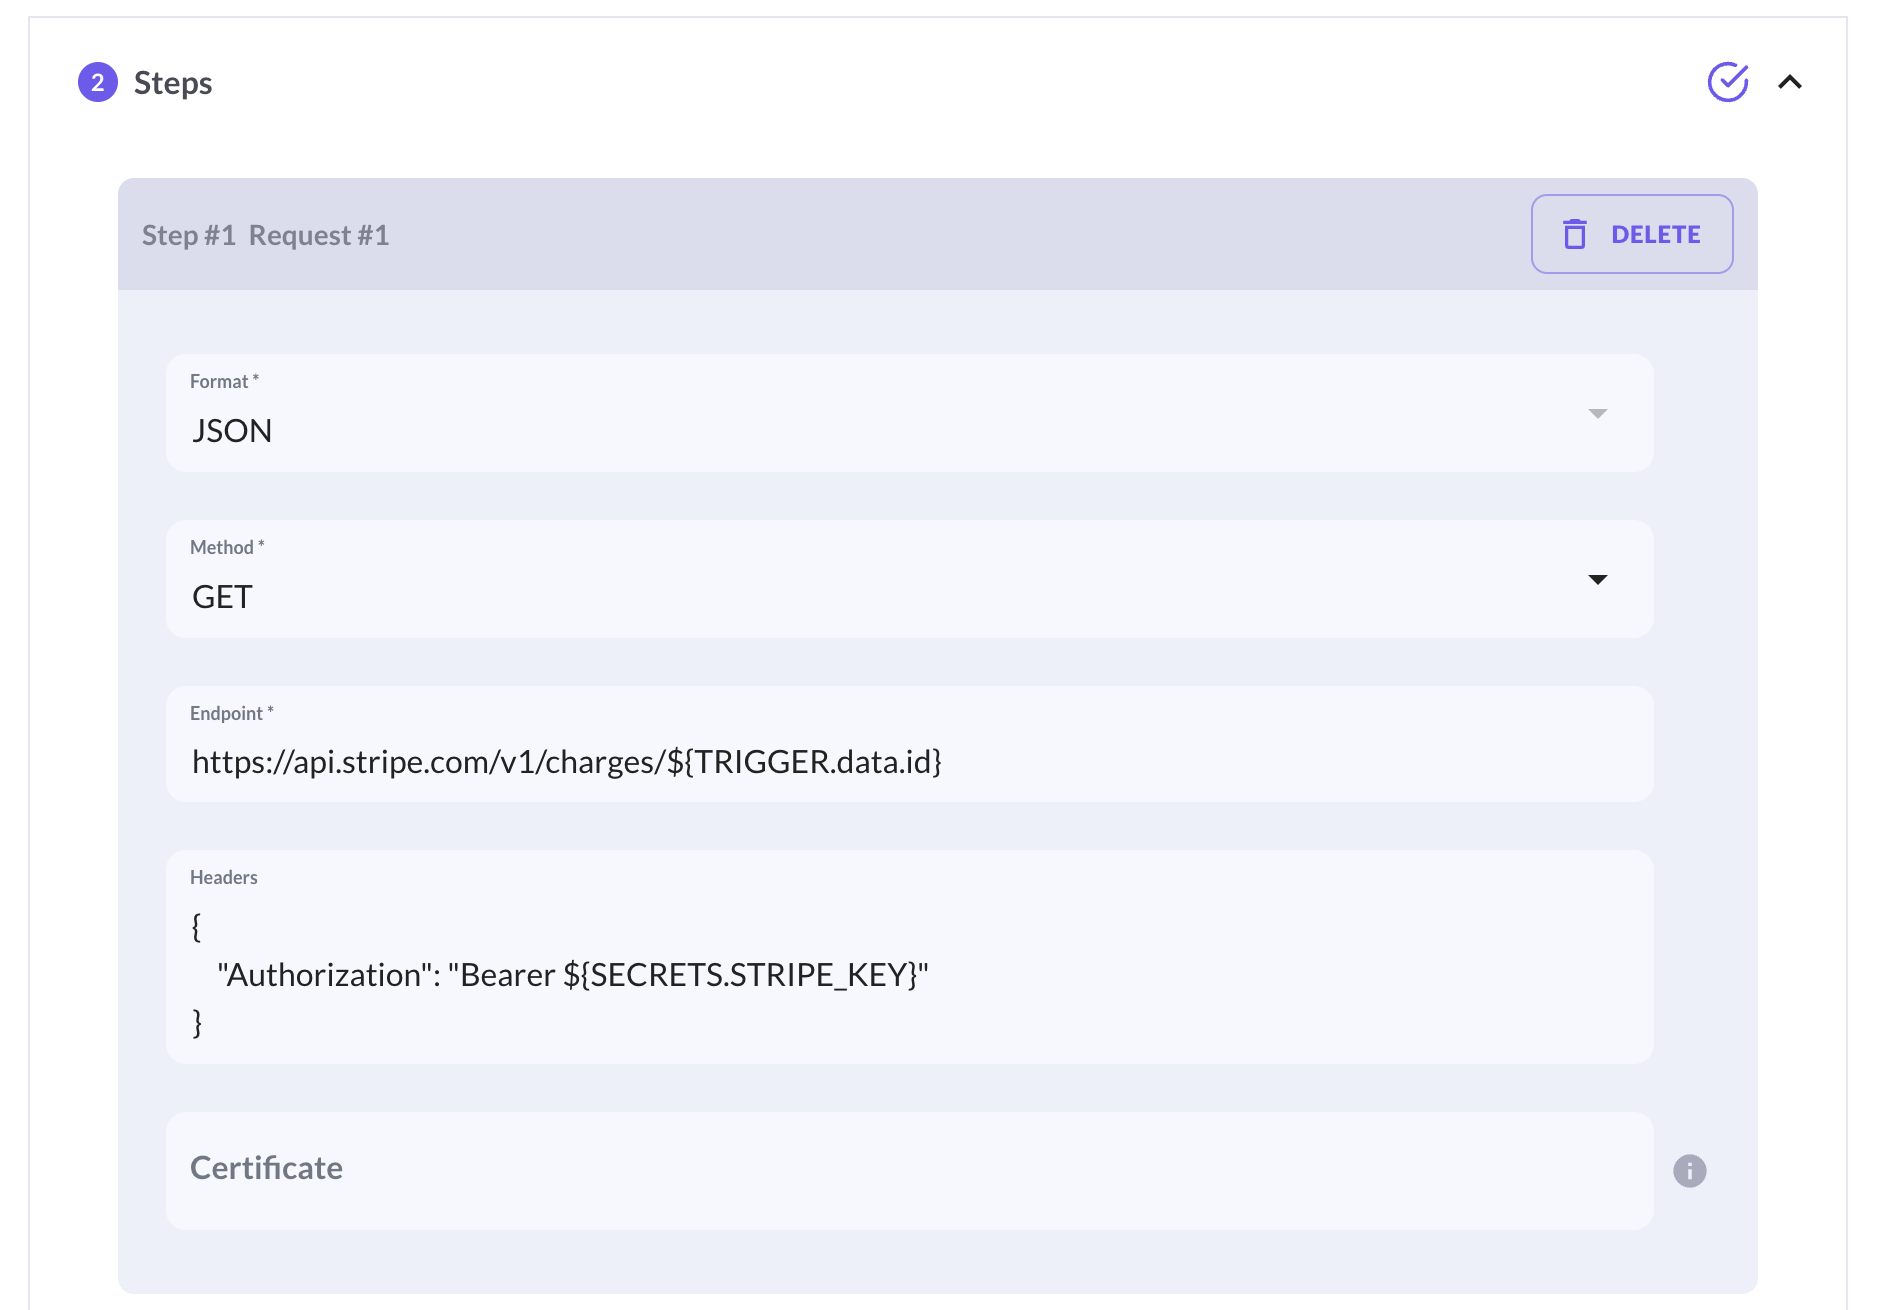
STEPS
In this scenario, the requirement is to retrieve information pertaining to a successful charge on Stripe, specifically verifying that a payment has been successfully processed and has not undergone a refund.
The JSON structure from Stripe API is as follows:
//Stripe API - Retrieve a charge response
{
  "id": "ddddd",
  "object": "charge",
  "amount": 100,
  "amount_captured": 0,
  "amount_refunded": 0,
  "application": null,
  "application_fee": null,
  "application_fee_amount": null,
  "balance_transaction": "dddd",
  "billing_details": {
    "address": {...},
    "email": null,
    "name": null,
    "phone": null
  },
  "calculated_statement_descriptor": null,
  "captured": false,
  "created": 1699873943,
  "currency": "gbp",
  "customer": null,
  "description": "My First Test Charge (created for API docs)",
  "disputed": false,
  "failure_balance_transaction": null,
  "failure_code": null,
  "failure_message": null,
  "fraud_details": {},
  "invoice": null,
  "livemode": false,
  "metadata": {},
  "on_behalf_of": null,
  "outcome": null,
  "paid": true,
  "payment_intent": null,
  "payment_method": "card_1OBy43B4COuxjkq9yeGsHvFd",
  "payment_method_details": {
    "card": {
      "amount_authorized": null,
      "brand": "visa",
      "checks": {
        "address_line1_check": null,
        "address_postal_code_check": null,
        "cvc_check": "pass"
      },
      "country": "US",
      "exp_month": 8,
      "exp_year": 2024,
      "extended_authorization": {
        "status": "disabled"
      },
      "fingerprint": "lutacpDrRShdNids",
      "funding": "credit",
      "incremental_authorization": {
        "status": "unavailable"
      },
      "installments": null,
      "last4": "4242",
      "mandate": null,
      "multicapture": {
        "status": "unavailable"
      },
      "network": "visa",
      "network_token": {
        "used": false
      },
      "overcapture": {
        "maximum_amount_capturable": 100,
        "status": "unavailable"
      },
      "three_d_secure": null,
      "wallet": null
    },
    "type": "card"
  },
  "receipt_email": null,
  "receipt_number": null,
  "receipt_url": "https://pay.stripe.com/receipts/payment/CAcaFwoVYWNjdF8xT0FiZXRCNENPdXhqa3E5KNiMyKoGMgZRGtwGRuw6LBZR_OV1u3WiTNirUhgu9eB153FkuA_-Uj_pbY4VCOMW0HON4vo3LIEMTtH5",
  "refunded": false,
  "refunds": {...},
  "review": null,
  "shipping": null,
  "source_transfer": null,
  "statement_descriptor": null,
  "statement_descriptor_suffix": null,
  "status": "succeeded",
  "transfer_data": null,
  "transfer_group": null
}
In the provided example, the JSON response yielded considerable private information, including details such as card and transaction information. However, through Silent Data [Oracle], we have the capability to selectively filter the pertinent information.
The configuration has the following structure:
- Format:JSON
- Method: GET
- Endpoint: https://api.stripe.com/v1/charges/${TRIGGER.data.id}
- Headers: {"Authorization":"Bearer ${SECRETS.STRIPE_KEY}"}
- Certificate: blank
In the context of attestation, the examination focuses on the "paid" and "refunded" properties within the Stripe response.
Rules 1
- Source: ${STEPS[1].data.paid}
- Operator: ==
- Target: true
Rules 2
- Source: ${STEPS[1].data.refunded}
- Operator: ==
- Target: false

Save your job configuration by utilizing the designated "SAVE DRAFT" button located at the top of the interface.
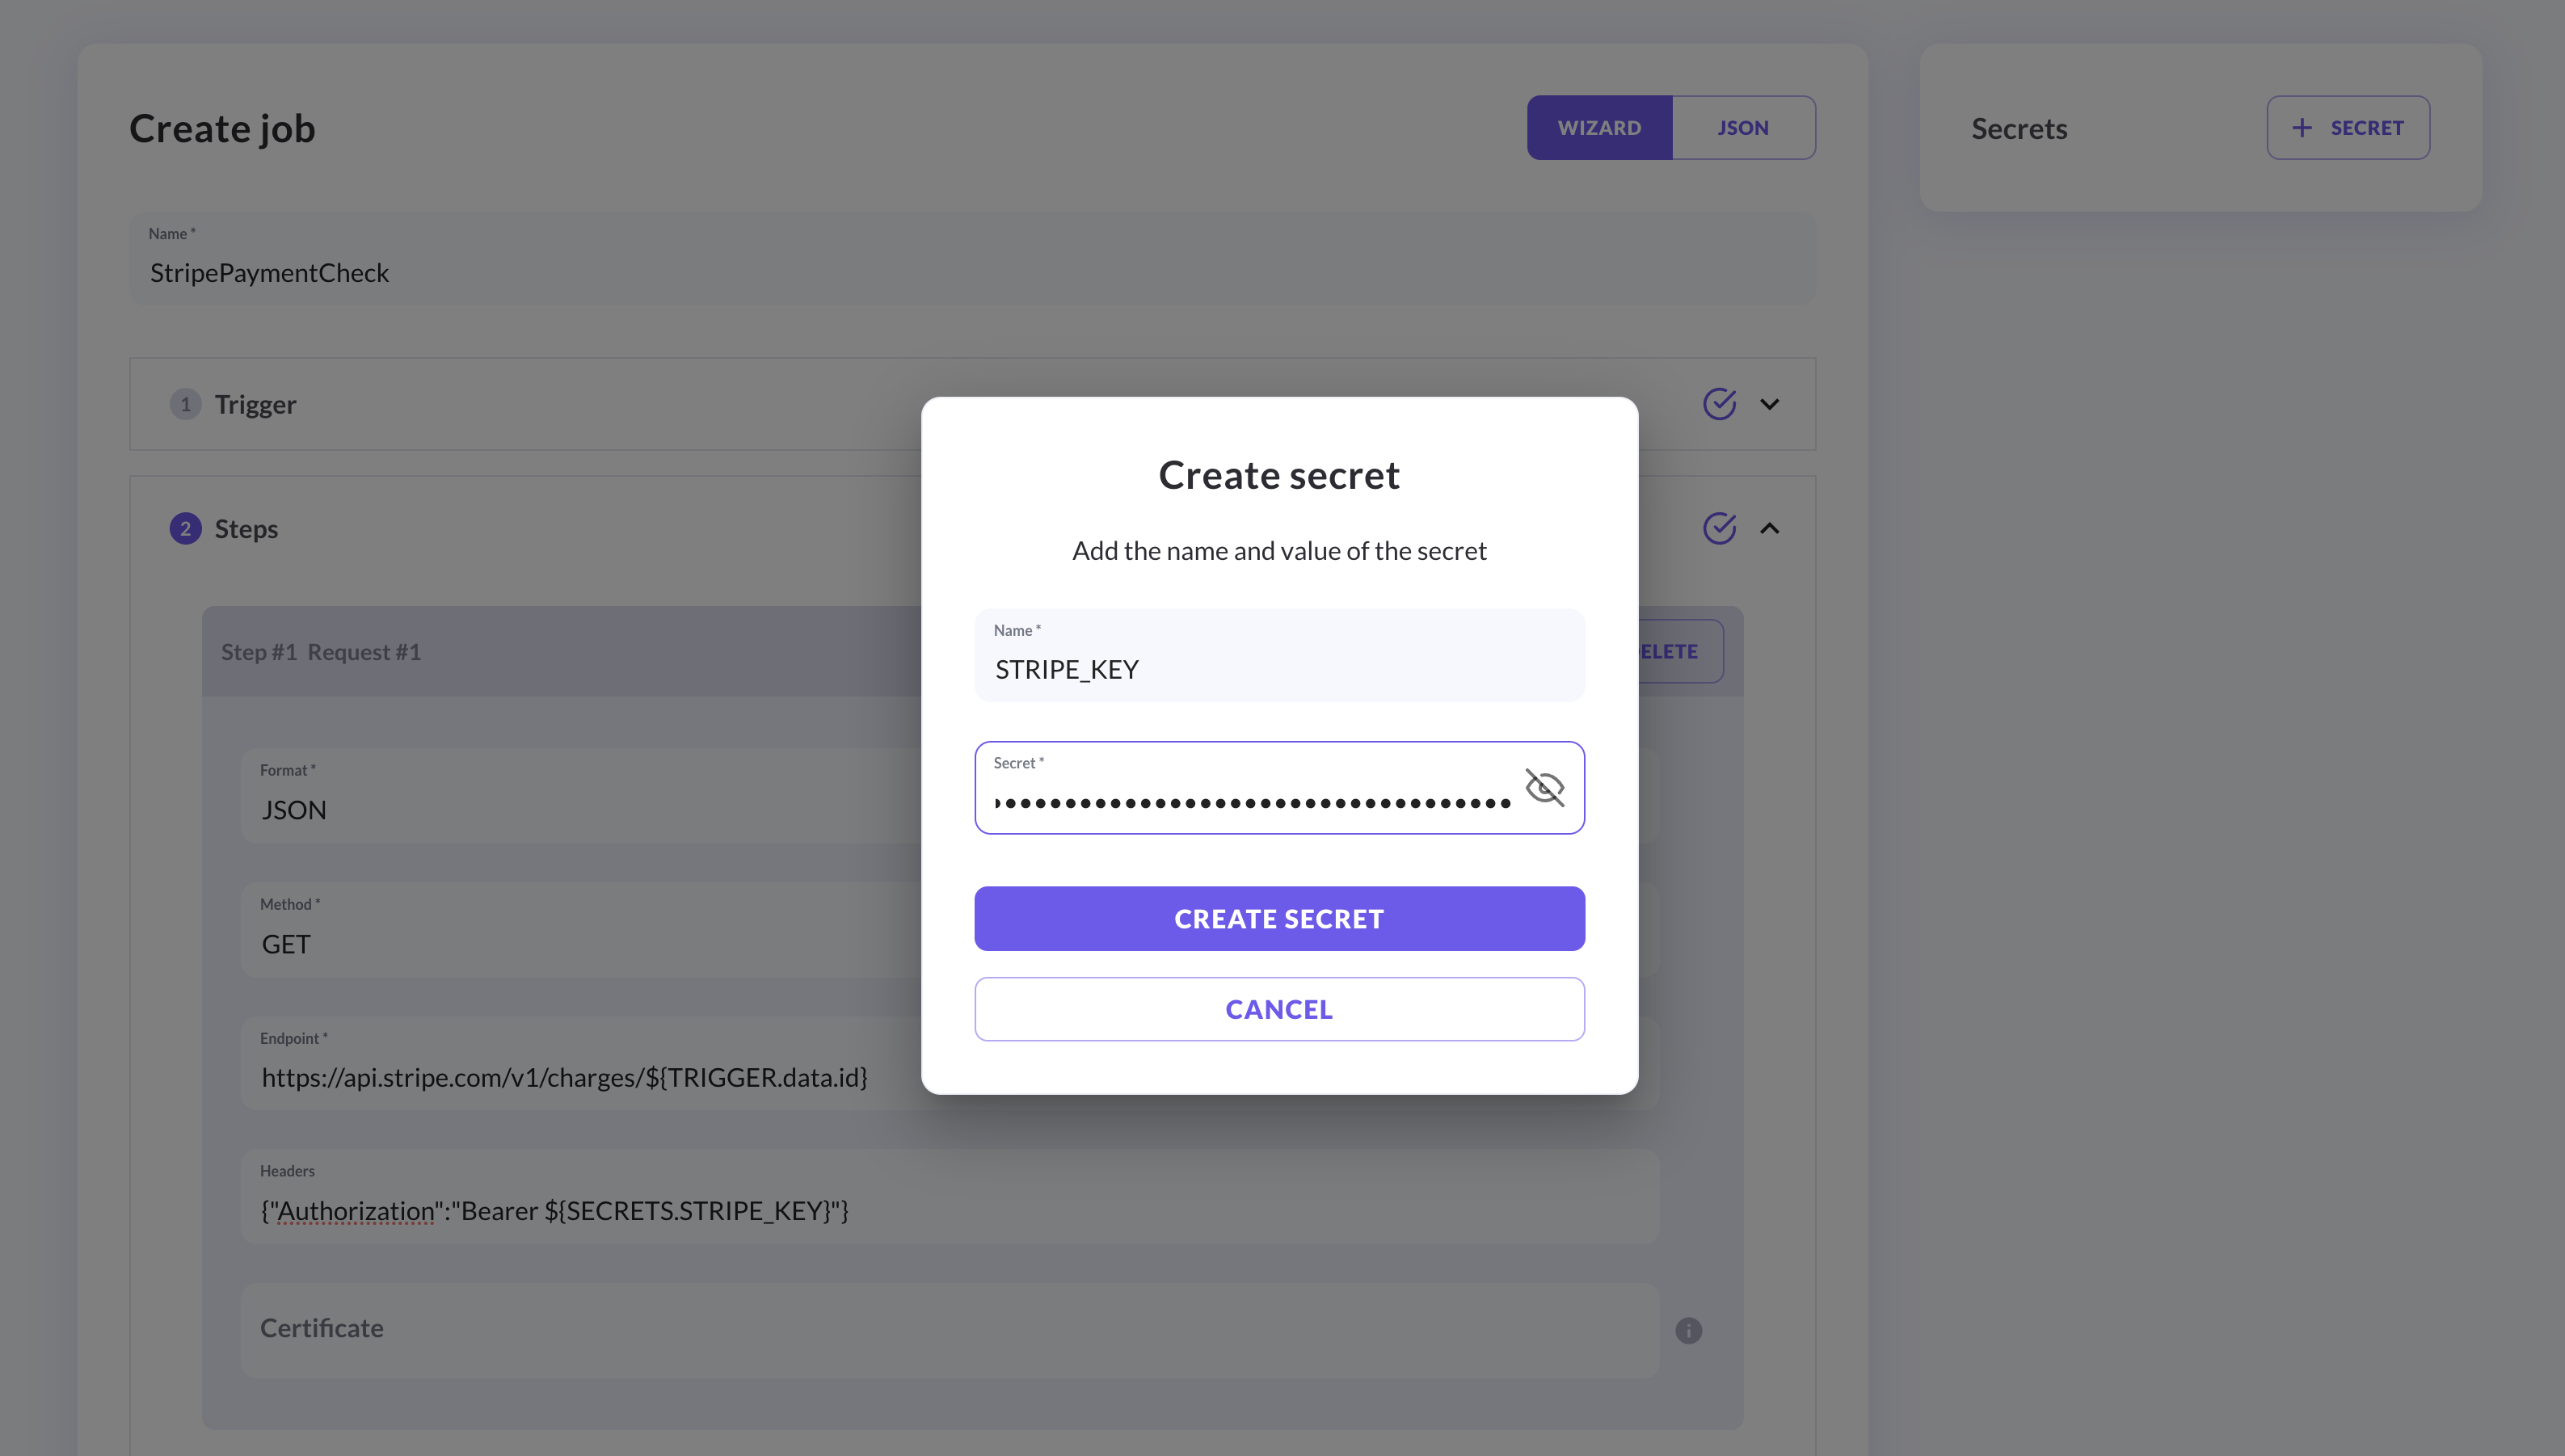
SECRETS
Authorization needs the inclusion of a secret key, which is configured in the dedicated "Secrets" section. Create your Stripe account to have your secrets keys Stripe Register.
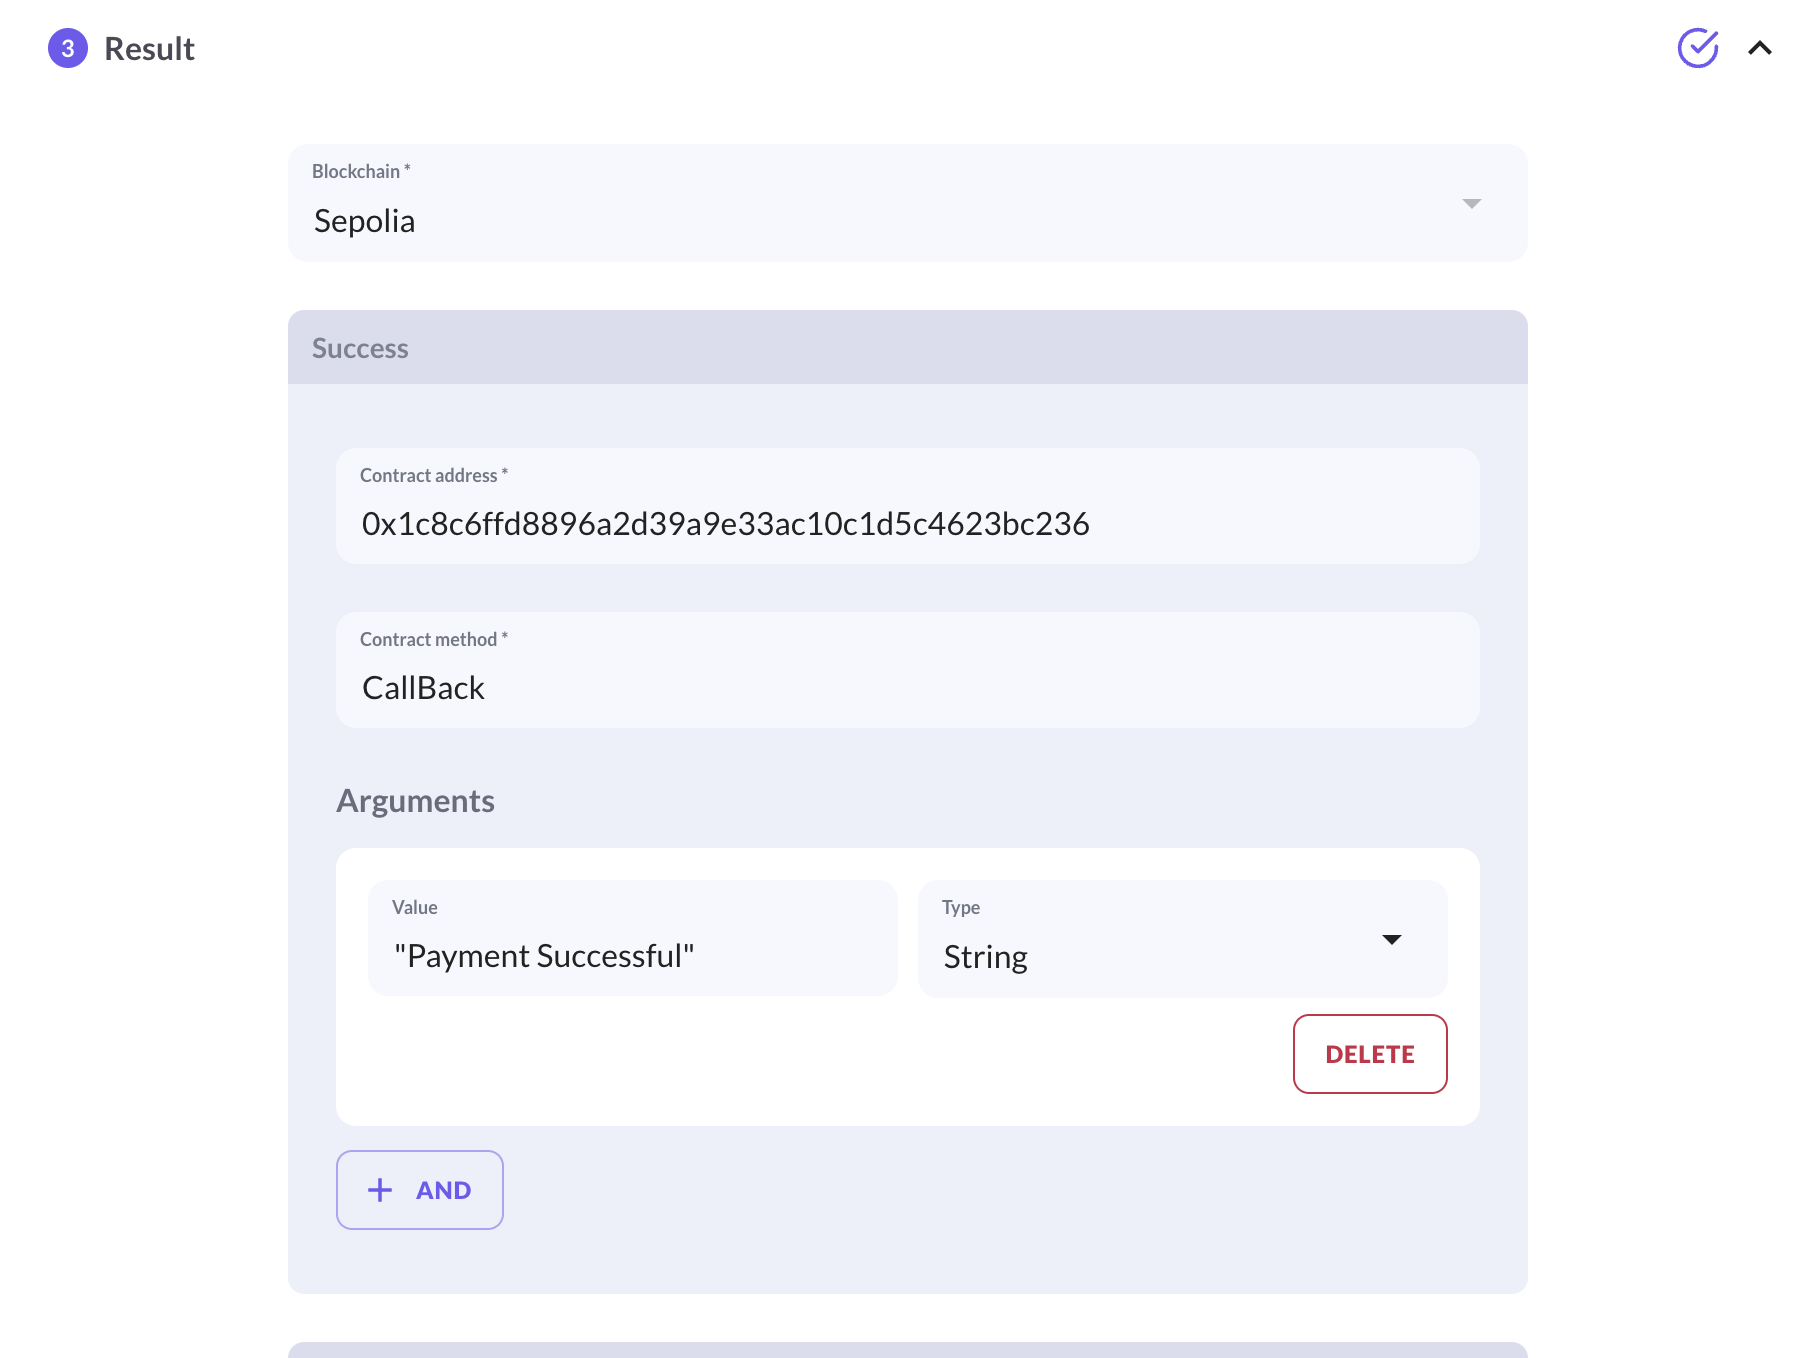
RESULT
Our next step involves configuring the Result section. In the provided example, a smart contract address is specified, representing an already deployed smart contract on Sepolia. Should you require assistance in generating a valid result smart contract, you can utilize the smart contract generator available on the dashboard. For the smart contracts address see here.
- Blockchain: Sepolia - the test option available
- Success
- Contract address: 0x1c8c6ffd8896a2d39a9e33ac10c1d5c4623bc236 - Etherscan
- Contract Method: CallBack
- Arguments
- Value: "Payment Successful"
- Type: String
//Callback Smart Contract generated from the Silent Data [Oracle] generator on the dashboard
// SPDX-License-Identifier: MIT
pragma solidity ^0.8.20;

// Use openzeppelin library to improve contract security
import "@openzeppelin/contracts/access/Ownable.sol";

contract CallbackContract is Ownable {
  address public resultsContract;

  // Modifier to ensure only resultsContract can call the method
  modifier onlyResultsContract() {
    require(msg.sender == resultsContract, "Caller is not the Results contract");
    _;
  }

  // Edit the funding contract address, callable by the contract deployer
  function setResultsContract(address _resultsContract) external onlyOwner {
    resultsContract = _resultsContract;
  }

  // Implement logic to be executed as the result of the SilentData Job
  function exampleMethod() public onlyResultsContract {
    // Your implementation here
  }
}
You can also configure a failure result, check how here Configure Results.
Save your job configuration by utilizing the designated "SAVE DRAFT" button located at the top of the interface.
TEST
You can also test the job configuration after you have configured it and before publishing it. Click on TEST, add the required input, in the current example is:
Allowed caller: blank
Payload :{"id":"ddddd"}
FUNDING DETAILS
Select the Funding Details
Token ID: USDC
Funding Manager Address: add your wallet address
Save your job configuration by utilizing the designated "SAVE DRAFT" button located at the top of the interface.
To acquire mUSDC tokens for leveraging the Silent Data [Oracle] functionalities on Sepolia, use the "TRANSFER" button accessible within the Dashboard.
Publish
Subsequently, proceed to publish the configured job with the "PUBLISH" button , initiating the triggering process. In the given example, by using the provided URL in a POST method, including the ID in the body.
For a comprehensive understanding of the Silent Data [Oracle] capabilities, see our guide for additional details and examples.
We value your feedback and encourage you to share your thoughts on Silent Data [Oracle].